Twilio Send Digits Then Wait Then Send Digits Again
Send Date Reminders with Twilio Studio
Date reminders are a breeze with Twilio Studio! Let's await at how to build a uncomplicated flow that hooks into your application via REST API and sends a reminder SMS with a confirmation message.
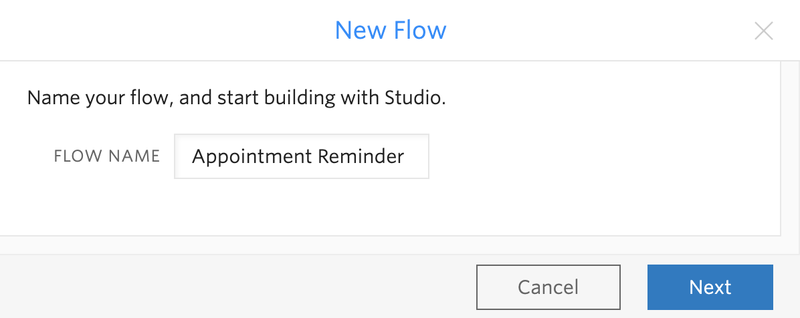
Create Your Flow
We'll start with a fresh Twilio Studio flow; log into your Twilio account and navigate to the Studio Dashboard, and so tap the + icon to create a new flow. You tin can name your period anything you like; nosotros're calling ours Engagement Reminder.
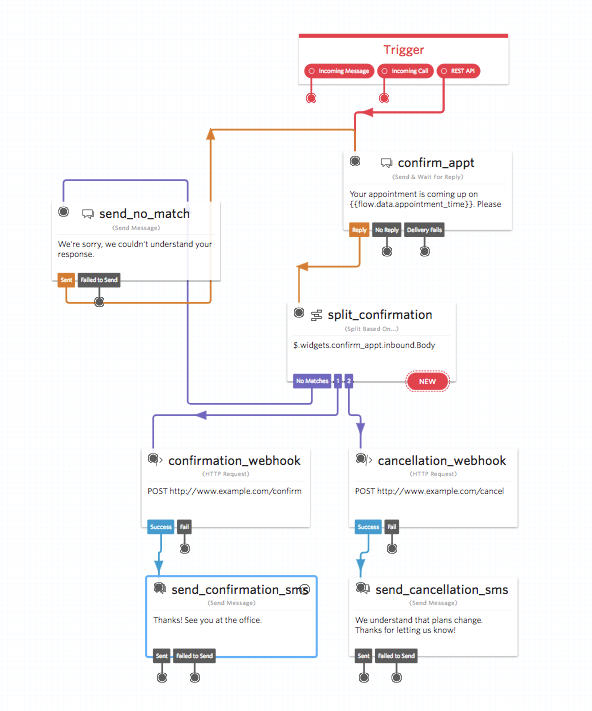
You'll observe that the canvas comes with a widget already in place -- that's the Trigger widget, which kicks off our period when the trigger we specify is fired. In this case, our trigger is going to exist a REST API telephone call. See the Rest API section of the Studio User Guide to learn how to make these calls.

Send & Wait For Reply
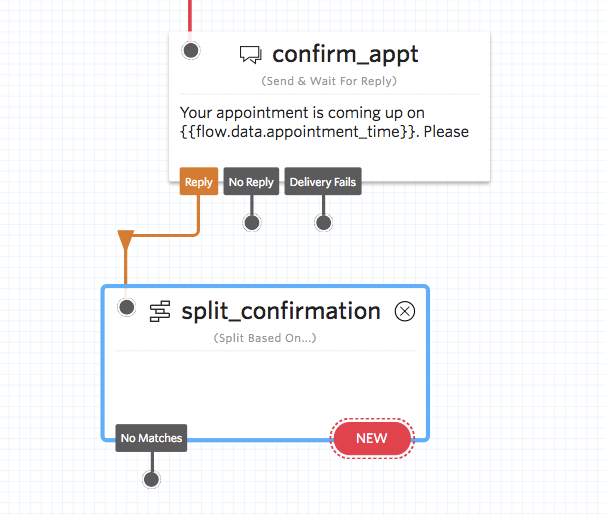
We'll start by dragging a Send & Wait For Reply widget onto the canvas, and connecting it to the REST API trigger by dragging the red dot to the grey dot in the corner of the new widget. Nosotros can use this widget to send an SMS to the user with a prompt to answer to. In this case, nosotros're going to employ a value (time) from our API call, and then the bulletin body is going to be "Your engagement is coming up on {{menses.information.appointment_time}}. Please reply ane to confirm and 2 to cancel." Studio supports the Liquid template linguistic communication, which is a fancy fashion of maxim "a way to help y'all load dynamic content throughout your flow." We're telling Studio that we'd like it to dynamically translate the text between the 2 curly braces based on something -- in this case, the appointment_time value from our request.

Divide Based on Reply
We're expecting the user to reply to this text message to confirm or abolish their appointment. We'll need some logic that will help the states know which choice the user would similar to make. We'll use the Split Based On... widget to assist handle that. Drag information technology onto the sail and connect it to the dangling Reply dot from our Ship & Wait For Answer widget.
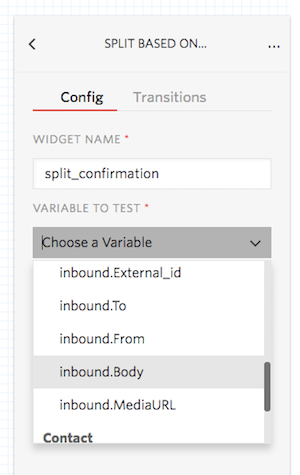
Beginning, we'll need to configure the variable we're testing. In this case, we're concerned with the user's reply, so we'll select confirm_appt then inbound.Body from the dropdown on the right-side console (yours may accept a unlike name if your Send & Wait For Answer widget is non called confirm_appt).
Ready Transition Conditions
Next, we'll need to declare the choices we're looking for in those text replies -- the digits ane and 2. Tap the red New at the lesser of the Split widget to reveal the Transition On... dropdown carte. Select Condition Matches to create a new Transition.
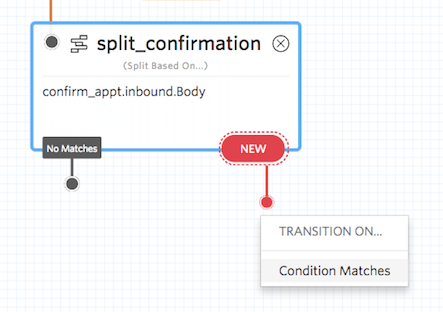
In the correct sidebar, find the new Transition that you just created, and select Equal To from the dropdown. We're going to set this value to 1, to confirm the appointment. Salvage the new transition and it volition appear on the widget.
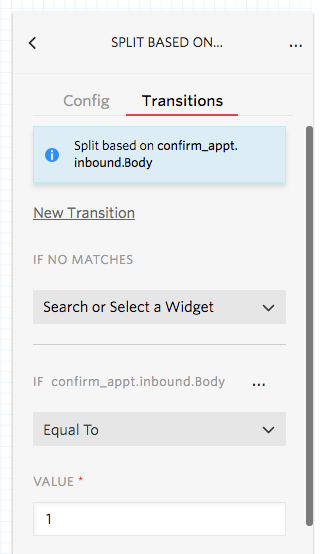
Adjacent, we'll need a condition for if the user has pressed 2 to cancel the engagement. Just as with the commencement Transition, nosotros're going to tap New, then select Condition Matches...., and then set the value equal to 2 in the sidebar and save. Our widget should look like this, with No Matches, 1, and 2 dangling from the lesser:

Make an HTTP Request
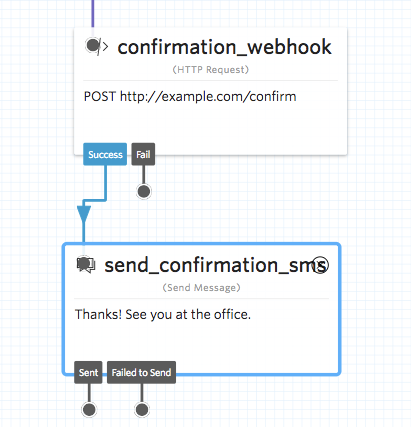
Next, we're going to want to handle the appointment confirmation by making a request back to our servers. Nosotros can do this by dragging an HTTP Asking widget onto the canvas and filling in the required fields (Request Method and Request URL) in the right sidebar. In this sample, we're using http://instance.com, but you'll want to fix the Request URL to the advisable endpoint for your application. If you lot'd like to ship a request trunk or parameters, y'all may set up those in the right sidebar equally well.

When the request successfully completes, we desire to text our user with a thank y'all. Nosotros tin practise this by dragging a Send Message widget onto the canvas, and populating the Message Trunk with our note for the user.
Counterfoil Path
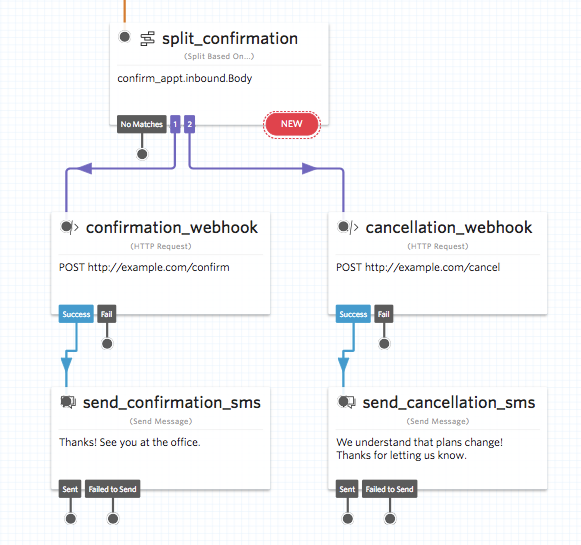
Now it's time to exercise the same steps once more, this time for the cancellation. We'll drag an HTTP Request widget onto the canvas and claw it to the dangling 2 from our Split widget, make a asking to our cancellation endpoint, and ship an acquittance bulletin to the user.
No Match Status
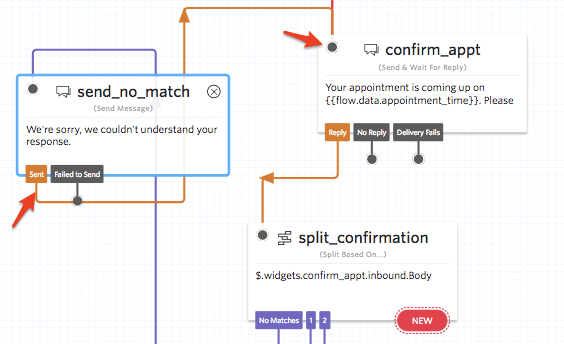
But what if the user enters text also 1 or 2 (our confirmation and cancellation atmospheric condition)? We tin can take reward of the congenital-in No Matches condition, and prompt the user with the reminder again. Elevate a Transport Bulletin widget onto the canvas and connect information technology to the No Matches dot, then enter the mistake message of your choosing. We can so re-prompt the user with the original appointment reminder by dragging the Sent dot on the Send Message widget to our original Ship & Look For Reply widget.
The Finished Product
The final land of the sail is that we have our Trigger widget have a Balance API asking, prompt the user to confirm or cancel with a Ship & Expect For Reply widget, routed responses through a Split Based On... widget, used HTTP Asking widgets to POST cancellations and confirmations dorsum to our ain endpoint, and used Transport Message widgets to acknowledge the user's response.
Time to test it out! You tin make a request from your API to Studio and kick off this appointment reminder flow, so text back to confirm or cancel. You tin utilize the following curl command to trigger this flow:
curl -Ten POST "https://studio.twilio.com/v1/Flows/FWXXXXXXXXXXXXXXXXXXXXXXXXXXXXXXXX/Executions" -d "To=${MY_PHONE_NUMBER}" -d "From=${FROM_NUMBER}" -d "Parameters={\"appointment_time\": \"Tuesday at 6PM\"}" -u $TWILIO_ACCOUNT_SID:$TWILIO_AUTH_TOKEN For more information about parameters, and other example of whorl requests, come across the Remainder API department of the Studio User Guide. Become fix to have your calendar perfectly synced with your clients!
Source: https://www.twilio.com/docs/studio/tutorials/how-to-send-appointment-reminders
0 Response to "Twilio Send Digits Then Wait Then Send Digits Again"
Post a Comment